In cases like this, the Windows auto-login option can be used to automatically log you into your computer without going through the Windows login page each time. Unfortunately, some Windows 11 users have reported that after they activated auto-login on their PC, it stopped working. This can result from incorrectly enabling the feature or a computer glitch. Thankfully, there are a few methods you can use to fix this issue, and we will talk about it in the next section of this article.
Fix Auto Login Not Working in Windows 11
It may be stressful when the auto login option is not working on your Windows 11 computer, but you should be aware that this feature is only advisable to be used when you are sure that no one can access your computer behind your back. On the other hand, these are the recommended solutions to fix auto login not working in Windows 11:
1. Disable Antivirus
Antivirus apps running on your computer may sometimes hinder some settings, which could be why you are experiencing the auto-login not working on Windows 11. Therefore, it is recommended that you disable the antivirus that is now running on your computer and then restart the computer. If the issue persists after disabling the antivirus app, you should try the next solution.
2. Enable Auto Login Using Windows AutoLogOn v 3.10
You can also try using the AutoLogOn v 3.10 to enable Auto Login on the computer if the problem still exists after you disable the antivirus app(s) on your PC. Many Windows 11 users who experience the auto-login not working issue on their computer have found success with this solution. Follow the step below to enable auto-login with Windows AutoLogOn v 3.10:
- Download AutoLogOn version 3.10 from Microsoft.
- After downloading the zip file, right-click on the file and select Extract All.
- Open the extracted files and double-click the one compatible with your Windows 11 computer to install it.
- Then, follow the on-screen prompts to install and open the AutoLogOn tool fully.
- After the tool opens, you will see a dialogue box with your device name and username; simply enter your login password in the password box and tap Enable. This function will turn auto-login on your PC and fix the issue you are facing on your computer.
3. Enable Auto Login With Windows Registry Editor
If the above method is not successful in fixing the auto login not working issue on your Windows 11 computer, you can also try enabling the feature using the registry editor. However, you should be aware that any mistake made in the registry editor may cause issues on your computer. Hence, you should follow the steps below properly
- Press Windows + R to open the Run command box.
- Type regedit in the box and hit Enter.
- On the registry editor window, navigate to the path below:
- On the right pane, double-click the AutoAdminLog entry and set the Value data to 1.
- Double-click the DefaultUserName entry on the right pane and enter your computer username as the Value data.
- Lastly, double-click the DefaultPassword entry and set your login password as the Value data.
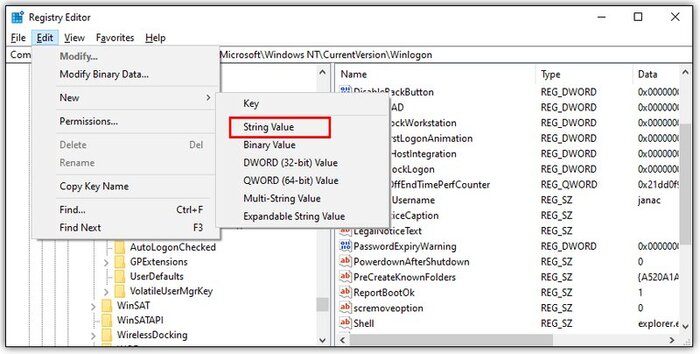
- If you can’t find any of the entries above, click Edit at the top of the registry editor window. Then place your cursor on New, select String Value, and enter the respective name of the entry you want to create.
- Afterward, you can now use the earlier steps to set the respective Value data for the entry.
- Restart your computer after these steps and the issue should have been fixed.
4. Enable Auto Login Using the netplwiz command
One other method you can use to turn on auto-login on your Windows 11 computer is through the netplwiz command.
- Press Windows + R to open the Run command box.
- Type netplwiz and hit Enter.
- On the User Accounts window, tap on the Users tab.
- Now uncheck the Users must enter a user name and password to use this computer box and click on Apply.
- Type in your username and password in the resulting dialogue box and click OK. After this, you should restart your computer, and the auto login not working on Windows 11 issue should be fixed.
How do I make Windows 11 not require a password at startup?
If you want to make your Windows 11 computer bypass the login password and not require a password at startup, you have to enable the Auto-login feature by using one of the methods discussed in this article.
Should I enable Auto-login on my Windows 11 computer?
This depends on who has access to your computer and how private you want your computer to be. You can enable auto-login on the computer if you have it in a place where only those you give permission to use it have access and want to bypass the need for them to enter the password every time they want to access the computer. In this situation, you can be sure that no outsider—let alone someone attempting to open it—can access the computer. On the other hand, if your computer is in an open space and holds sensitive data or you don’t want unwanted access to it, auto-login won’t be a good option for you.
How do I prevent my PC from locking when idle?
To prevent your Windows 11 computer from locking when idle, follow the steps below:
- Press Windows + I to open Settings on the computer.
- On the left pane of the Settings page, click on Personalization.
- On the right pane, click the Lock screen option and select Screen timeout.
- Now tap on the Screen and Sleep option and change the value to Never.
Final Words
The auto login not working in Windows 11 issue is majorly caused due to incorrectly enabling the feature. However, we’ve covered a variety of solutions in this article to help you, so use them to avoid using the Windows 11 login option on your computer. Recommended Reads: How to Enable Auto Login In Windows 11